

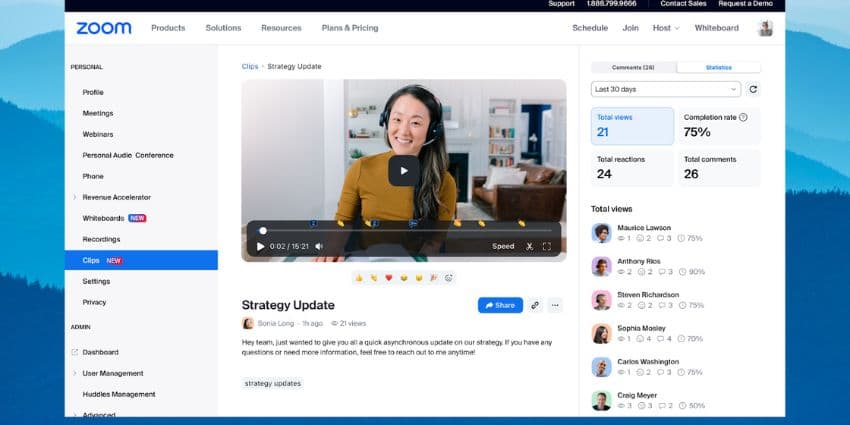
Written messages and emails aren’t always the best way to convey exactly what you need to say to your team members. However, scheduling a video meeting with your team can be complex, too – particularly when your calendars don’t align. That’s where Zoom Clips comes in.
Introduced by Zoom in 2023, Zoom Clips rolled out globally at the end of the year, introducing a new way for teams to use video to collaborate asynchronously. It’s a great tool for cutting down on video meetings and ensuring you can still communicate effectively with your team.
With Clips, you can create and share fast-paced video messages with colleagues across time zones. Plus, you can even store your clips and go back to them later. Even more exciting (and potentially worrying), is that Zoom is adding new AI capabilities to Clips in 2025.
Soon, you’ll be able to create clips that allow a custom AI-powered avatar to step in and share a message on your behalf. Here’s everything you need to know about Zoom Clips.
What is Zoom Clips?
Zoom Clips is a simple tool that enables users to record, edit, and share short-form videos with their team. You can record your face, voice, and screen, then edit your video to include any additional information you might want to share.
The Basic Clips feature is available to everyone, but there are limitations. For instance, you can only record five clips lasting up to two minutes each. If you choose the Zoom Clips Plus add-on for your free Zoom Workplace plan, those restrictions are removed. However, it will cost an extra $6.99 per month for each user.
Alternatively, if you’re using one of the paid Zoom Workplace plans, Zoom Clips Plus is included at no extra cost. Features include:
- Recording: You can easily record videos from your Zoom web portal, computer menu, taskbar, or Zoom app. You can also record screen and camera feeds (with audio) simultaneously. Plus, you’ll have access to noise suppression and virtual backgrounds.
- Editing: Once you record your Clip you can edit its name, apply tags for easy searching, add a thumbnail, and cut and trim various sections of the Clip.
- Sharing: Users can set permissions for who can view a Clip, generate shareable links, view video analytics, and receive comments on clips.
- Engagement: Your team can leave comments and reactions on a Clip, and you’ll be able to manage, share, rename, download, and delete Clips in your content library. You can also search for clips based on their tags or title.
What is Zoom Clips with AI Avatars?
If you’ve been staying up to date with Zoom’s journey in AI lately, you might have heard about the new AI avatar feature for Clips, announced at Zoomtopia in 2024. This new feature, which will be rolling out in 2025, will give users the option to create an AI avatar of themselves.
You’ll need to record an initial video of yourself, which Zoom will use to create an avatar that looks and sounds like you. From there, you’ll be able to write the messages you want your avatar to say in a Zoom Clip, and the avatar will do all the talking for you.
It’s an interesting new feature for anyone who doesn’t like spending a lot of time on camera. However, there are some risks to consider here, too. Zoom has already mentioned that it’s taking the potential risk of “deep fakes” created with AI into account.
The company has said that it’s using advanced authentication, watermarking technology, and strict usage policies to help minimize that threat. Still, it’s worth ensuring you’re aware of the threats of allowing AI to digitally “clone” your voice and appearance.
The AI avatar feature will be released for Zoom Clips as part of a new “AI Companion add-on” kit that Zoom will introduce at the beginning of 2025. The add-on also promises access to a few other advanced Zoom Companion features if you want to build on what the current bot can do.
Even if you don’t have this add-on, you can create Clips using pre-set avatars and voices designed by Zoom.
How to Use Zoom Clips: The Basics
Now you know the answer to “What is Zoom Clips?” you might be wondering how to use it. We created a comprehensive guide to getting started here, but here are the basics you’ll need to know.
First, you’ll need the right license for Zoom to access Zoom Clips Plus and remove the restrictions on the basic free plan. You’ll also need the latest Zoom desktop or mobile app version to access the feature.
Once you have the right license, you can enable it for your account by signing into the Zoom web portal, and clicking Settings then Clips on the navigation menu. Just toggle the option on to enable it. You can also implement settings here like:
- Allowing other users to access and download your clips.
- Asking for a password from users to access the clips you share.
- Receiving notifications when the first person views your Clip, when you receive a reply to a Clip, or when someone leaves you a comment.
After you’ve enabled Zoom Clips for your account, you can create a Clip from the Zoom desktop app or web portal. There doesn’t seem to be an option for mobile users yet.
Using Zoom Clips: Adjusting your Settings
Before you start a recording, you can adjust various settings for your Clip. When you launch Clips on Zoom’s web or desktop portal, you can choose if you’re sharing your screen or your video or just one of those options. If you’re sharing your screen, you can use the Basic settings to choose the screen you want to record and click Optimize for a video clip.